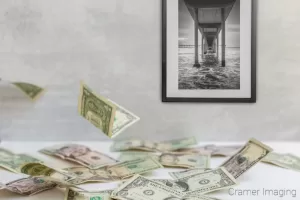
You’ve just invested in some fine art photography and now you want to protect your investment by making sure that it survives and remains beautiful for years to come. With any kind of photography, fading is probably one of your biggest dangers. How do you prevent this tragic loss of art and money from happening in the first place? That’s what we’re going to discuss today: how to avoid fading photos.
 Let’s properly set your expectations from the start. It’s impossible to completely stop the degradation of a photo, painting, document, etc. You cannot completely avoid fading photos. It’s just going to happen over time.
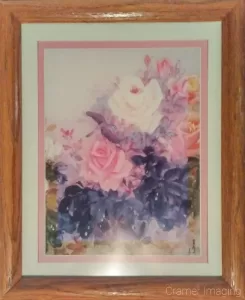
This picture to the left (or above) is a great example of what you can eventually look forward to. Note the faded and discolored center of the image. The edges still bear the original colors suggesting the fading was not uniform.
However, there are ways to minimize it and, thereby, extend the life of your art. Here are three simple but important things you can do to help avoid fading your quality wall art photos.
1. Think About Positioning
Since most of the fading comes from ultraviolet (UV) light, the first and best thing you can do is to keep your photos out of direct sunlight. Sunlight is immensely bright and can cause irreparable damage easily. The more sunlight that hits your photos, the faster they will fade. Staging photos away from sunlight will be the best way to prevent fading even if you can’t use the other methods below.
While not as dangerous, reflected sunlight can also cause some damage. Take that into consideration when positioning your photos. Light reflected off of a glass or a highly polished table can do just as much damage long term as direct sunlight can.

Heat can also cause some fading so keeping your images away from significant sources of heat is also helpful. A photo near a stove in the kitchen, for example, will fade faster than one in a cooler room.
2. Add UV Coated Glass
Once you have your staging figured out, there are a couple more things which you can do to your photos to keep them from fading. A UV coating for the glass will help. Even standard cheap glass will block some of the UV light, but a full-on UV filter coating will stop a lot more from getting through and damaging your photo. Please remember that no visually transparent glass will stop all of the UV rays from getting through, but most will stop over 90%.

You can also add UV filter tints to your windows. These will block most of the ultraviolet rays from even entering through the window. If you are into DIY, you can generally purchase the tints at your nearest big box hardware store. If not, there are numerous companies who will install them for you. As always, do your research to find out who does the best work in your area.
3. Choose Indoor Lighting Carefully
Another source of ultraviolet light is interior lighting. There are three main types of interior lighting in use today: Incandescent (or the standard light bulbs that have been in use for over 100 years), Fluorescent lighting (which come in either the long tubes or the newer twisty compact fluorescent light [CFL] ), and the most recent addition of LED (light-emitting diode) light.

Incandescent Bulbs
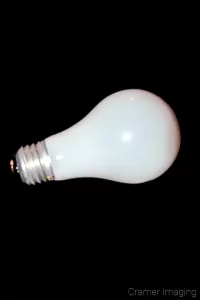
Incandescent lighting produces a full spectrum of visible light and is the best choice for viewing pretty much anything, especially art. However, it does produce some UV light, as well as quite a bit of infrared (otherwise known as heat). This is unavoidable because heating up the filament inside until it glows creates the light.
Bulb-makers try to engineer their bulbs to minimize the non-visible wavelengths of light (UV and infrared) in order to create brighter bulbs for lower wattages, but it is impossible to get all of the UV out of an incandescent light without some sort of specialized filter.
As far as I’ve been able to ascertain, are no commercially available UV filters for general house lighting. If you’re intent upon filtering your incandescent light bulbs, you might look into incandescent museum picture lighting fixtures. Those are likely to have some available if you can still find incandescent museum lighting. Most museum lighting seems to have moved to LED.
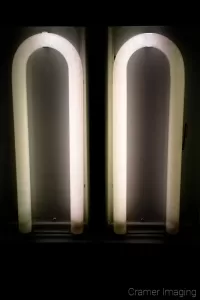
Fluorescent Bulbs
Fluorescent lights come in two styles: standard tube type, and the compact fluorescent lights (or CFL). Though they work in exactly the same way, CFL lights generally give off a lot more UV than the tube-type of fluorescent lights. This is because of how the light fixtures work and how each kind of bulb is constructed.
Since both the regular tubes and the compact bulbs are produced for the consumer market, we will discuss both options of fluorescent light.
Fluorescent lights produce light by exciting a low pressure mercury vapor inside. This emits a bluish light along with a great deal of UV light. This light then strikes the interior fluorescent coating of the tube. Most of the bluish/UV light is stopped by this coating, which then emits a whitish light, though the exact color can depend.
This coating should block most if not all of the UV light and, indeed, it generally does on the tubes. CFL’s, on the other hand, are another matter.
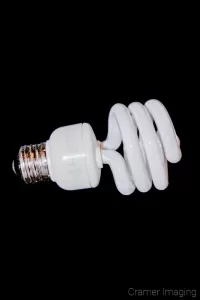
When a CFL is produced, they create a long straight tube and put white coating inside. The tube is then heated and bent into its characteristic spiral pattern. Then they connect it in to the regular light bulb socket fixture rather than the traditional fluorescent light connectors.
The problem is that the interior coating is brittle and bending it causes some coating fracturing. UV light then escapes through these fractures. Depending on the exact quality of the CFL bulbs you purchase, you could be getting a significant amount of UV light coming through which will be detrimental to your photos.
Even fluorescent tubes may not be 100% UV blocking either as nothing is manufactured perfectly. Most customers won’t notice if there is a little UV leaking from their fluorescent lights since UV is out of the visible spectrum for human beings.
If you’re wanting to filter UV light from your fluorescent lights, there are options for you. For fluorescent tubes, there are plastic UV filter tubes which simply go over the standard tubes to filter out any extra UV light. These may be redundant, but for some they may provide some peace of mind. Currently, there doesn’t appear to be UV filtering options for CFL bulbs on the market.
LED Bulbs
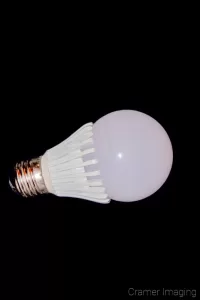
Light Emitting Diode (LED) lighting produces a fairly pure wavelength of whatever color that particular LED is designed to emit. While the LED spectrum can range anywhere from infrared (such as in a television remote control) to UV, the LEDs in LED bulbs for standard lighting purposes generally emit blue light. This blue light then hits a fluorescent coating on the glass bulb which then emits white(ish) light to the room.
While there are some reports that a small amount of UV can be emitted from LEDs, the fluorescent coating stops most of that radiation by design. Even so, we would consider the amount of UV emitted from an LED bulb negligible, even over an extended period of time.
LEDs do not produce a full spectrum of light and can affect how you view fine art as compared to incandescent lighting.
Ambient Light
Your final lighting option, and final source of UV fading, would be ambient light. There really isn’t much that can be done about this UV source. You need to see. Besides, what’s the point of art if you don’t get to look at it? You can reduce UV exposure by only turning on gallery lighting when you specifically want to display or enjoy the art. Compare this concept to not generally leaving your Christmas tree lights on all the time.
Factors You Can’t Control
The last source of photo-fading is from a large number of miscellaneous sources. The biggest source of which is the natural degradation of the chemicals used in creating the image. Frankly there isn’t much you can do about it.
As time goes by, we’ll get better and better inks for printing photos. The problem is that, while we can project in a limited fashion how inks will fade and degrade over time, we simply don’t know for certain until the a picture gets very old. Even the paintings from hundreds of years ago are changing in color over time as the various chemicals in the paint slowly age and change.
One thing to remember is that, since light and heat are both catalysts for chemical reactions, keeping them to a minimum is going to be the best way to slow down this degradation as well.
Buying fine art photos which use archival quality ink and paper should help prevent fading.
Best Options to Avoid Fading Photos
So how do you minimize the fading on your fine art photography? The best way would be to go to all LED lighting in your house, keep them away from direct sunlight and sources of heat, and install UV filters over everything you can.
With all that being said, we cannot wholeheartedly recommend going to just LED lighting. When we tried it, we found we developed some serious eye strain issues. We both found it nearly impossible to read normal sized print under currently-marketed LED lights. CFL lighting was even worse for our eyes, but the problems mostly ceased under old fashioned incandescent lighting.
If the LEDs don’t bother you, go for it. Use them to your heart’s delight. Enjoy the benefits of energy cost reduction which they reputably bring. However, if they do bother you, incandescent lighting in the room is not likely to cause all that much fading. Whatever the case, we cannot recommend CFL lighting because of the large amount of UV leakage that happens.
As for lighting your photos directly, most gallery lighting appears to be LED based now. Currently, incandescent lighting will provide a fuller spectrum and better looking light. Experts are currently working on full spectrum LED lighting. Perhaps, in the future, we will recommend LED lighting all the way. For now, LED lighting may look pretty good and will insure a longer lasting piece of art.
Conclusion
Protecting your photos long-term by minimizing fading isn’t difficult. It is simply a matter of understanding what causes fading and minimizing it. With proper positioning, UV reduction, and lighting, you will help ensure that your photos will be bright and colorful for years to come. In the end you will never 100% stop fading, but you can slow it down a great deal. You can avoid fading photos.
Got any tips to avoid fading photos which we missed? Have you found a new kind of light bulb on the market which negates UV? Share them in the comments section below. We’d love to learn about the latest protections available for our fine art photography.


Best Sellers

Cramer Imaging Newsletter

Receive monthly updates in your inbox from us.