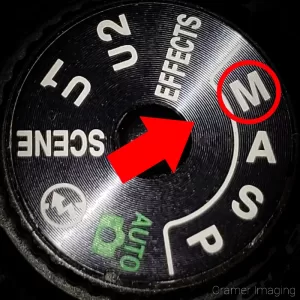
If you’re new to photography and have just bought a DSLR camera, you might have noticed a dial at the top of the camera which has different camera modes. Many of these have little pictures like a moon for night mode, a light bulb for indoor mode, a sun for outdoor mode, etc. There should also be 4 modes simply labeled as P, A, S, and M or some variants discussed later. Ever wonder what those are for? Today, we’re talking about PASM camera modes.

Firstly, cameras these days have lots of different settings you can use to take the photos you want. The more complicated the camera, the more settings there are. The more settings there are, the more you can do with the camera if you know what you’re doing.
The Basics
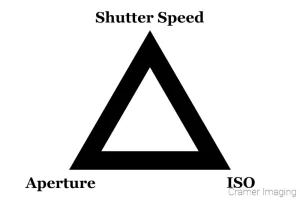
So, to start with, there are three main controls for cameras which most serious photographers worry about. They are called the aperture (or diaphragm), shutter, and ISO or film speed (light sensitivity). Each of these settings controls how much light is let into the camera’s sensor/film and also how sensitive it will be to that light. Through manipulating these three settings, you create your final photographs. To learn more about these settings in depth, check out this article on the exposure triangle.
Those basic automatic settings like night mode, outdoor mode, candles, indoor mode, etc. control these main settings (along with some of the minor ones as well) to make your final photos. The presets do what you want without you having to think about it. However, if you don’t already know, there’s ratios and other math involved with creating a properly exposed photograph. These basic automatic settings remove all the math from your hands and make the camera do it for you. Thus you can take your photos and end up with a decent-looking photo looking basically the way you hoped with little effort on your part.
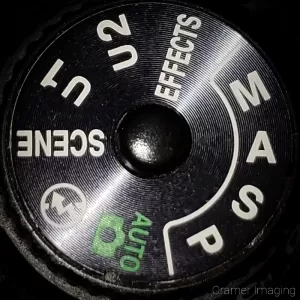
The PASM camera modes give you much more control over your camera’s main settings but at the cost of making you do some math or guesswork instead. So, here’s the basic breakdown of how each setting works.
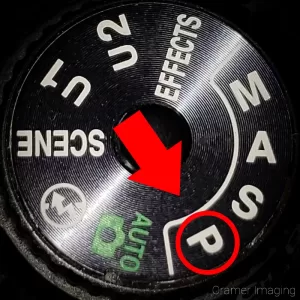
P Mode
The P in P mode is short for Program mode. When you rotate the dial to this camera mode, the camera controls the aperture and shutter speeds. You control the ISO only. This means that the camera will automatically adjust the shutter and aperture to create a properly exposed image based upon an ISO you enter and the available light (or absence of light) in the scene you’re shooting.
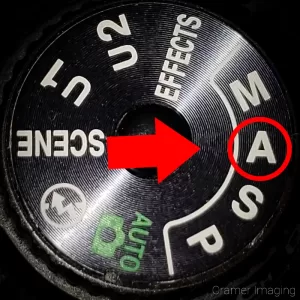
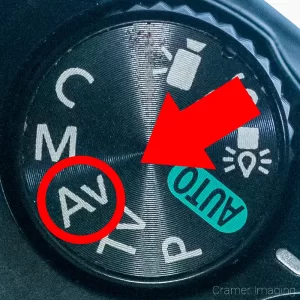
A Mode or Av Mode
The A in A mode is short for Aperture Priority mode. It is also labeled as Av on some camera models, which is short for Aperture Value. In this camera mode, you now have control over 2 major camera settings. You control the aperture and the ISO. The camera controls the shutter speed and will calculate what shutter speed to use based upon your aperture and ISO values in addition to the available light in the scene.
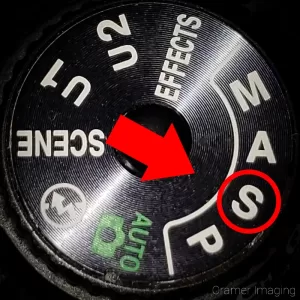
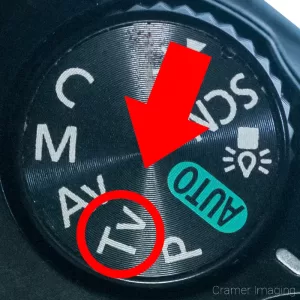
S Mode or Tv Mode
The S in S mode is short for Shutter Priority mode. It is also labeled as Tv on some camera models which is short for Time Value. As with A or Av mode, you control 2 major camera settings. However, this time you control the shutter speed and the ISO. The camera will control the size of the aperture and calculate that value based upon your shutter speed and ISO values along with the available light in the scene.
M Mode
Finally, the M in M mode is short for Manual mode. This is probably the least-used mode on most cameras. The reason is that it gives you complete control over all 3 major camera settings. In this mode you control the aperture, shutter, and ISO. So, you need to assess, using the available light on scene, what settings to enter into the camera to create the photo you want. The camera handles none of this for you so, in essence, there’s no safety net using this mode.
Note: many people don’t know how to create a properly exposed image without help so they don’t often use this camera mode.
The Application
Once you know the basics of how a camera works and how to manipulate the main camera settings though PASM camera modes, then the hard work begins. Learning how to best use these camera modes to create the photos you want takes lots of practice. Trial and error will play a huge role in your learning curve. However, there are amazing things you can do in photography once you learn how to properly manipulate these settings to your advantage. Check out some of these articles below for ideas.

Best Sellers

Cramer Imaging Newsletter

Receive monthly updates in your inbox from us.