I’ve been a photographer for several years now. Over that time, I’ve made a lot of mistakes and missteps. I made many mistakes as a beginner photographer. Since they say that good decisions come from wisdom and experience and also wisdom and experience come from bad decisions, perhaps I should share some of my experience. I’ve already started sharing some in parts 1 and 2. So, here are 5 more tips which I really wish I would have known as a beginner photographer.
When I was a beginner photographer, I wanted to take all the coolest and most amazing photos I could. Of course, this meant that I simply must use the proper gear to take the shot. I must equip it before even trying. That philosophy came back to bite me early on when I accidentally discovered some coyotes in the grass. They were long gone before I equipped the proper lens for the shot. So, I never captured that shot. After that disastrous attempt, I established the “Coyote Rule” and I still follow it to this day.
To sum up the coyote rule, it’s “Use what equipment you currently have equipped to get SOMETHING. Then try for more optimal equipment.” This new philosophy serves me well. It’s because of this ideology that I managed to capture the following photos with literally only minutes or even seconds to do so.

If not for my rule, I would not have captured either of these beautiful scenes. You can do the same. If you feel you might not have time to get the perfect shot, then take ANY shot. At least you’ll have something to show for it. Perhaps it’ll even be a shot you can use and show off.
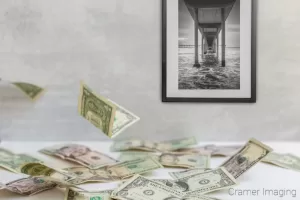
So, you’re a beginner photographer and you’ve taken some photos you want to show off. Perhaps you want to print them for others to see and enjoy. Now you must choose where you want your photos printed. I advise you to steer away from low-end kiosks such as Walmart, Walgreens, or even Costco. Just because they’re convenient does not mean they are quality.
I’ve used these particular photo kiosks before. Sadly, I found their print quality to be sub-par for what I wanted. The prints were heavy on the black which made them darker and a bit discolored. The prints, for me, left something to be desired. Now, if you routinely overexpose your photos or shoot in harsh direct sunlight, then these printer settings might be ideal for you. Again, if you don’t mind lightening your photos some, then use photo kiosks such as these. But, if you want to become a serious photographer, then you must step things up.

I don’t care if you want to be a professional photographer or a dedicated amateur, if you’re serious, you need a high quality print company. Research out high end kiosks on the internet. I personally know of a few such as White House Color Customs (WHCC), McKenna Pro, Mpix, Pro-DPI, and more. These are larger national companies. I’ve also located some smaller regional companies which do just as well or better. If you’re international, then I re-iterate the internet research angle.
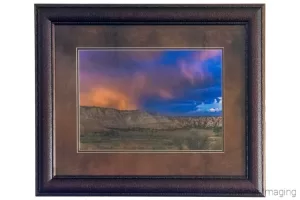
High end print services will tell you several points of information up front. These points include which printer profiles to use, what kind(s) of paper/canvas/metal/acrylic/etc. they offer, matting and framing options if applicable, and more. They expect you to know you must submit files with a minimum of 300 dpi if you want a seamless-looking print. You’ll find they offer lots of information of specifics, including some information you might not know. You may often clear up that knowledge gap with a simple internet search.
If you, as a beginner photographer, choose to pursue photography seriously, you’ll thank me for this tip. Your photos will look amazing as you learn how to take proper photos and process them up until they shine.
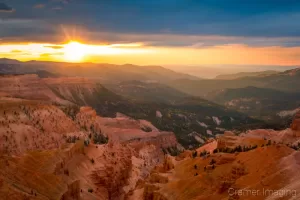
Eventually, beginner photographer, you will look into long exposure photography. There’s so much you can do with such photography. It’s versatile and fun. It creates amazing results. However, there’s one thing you cannot do with long exposure photography: hand-hold the camera.

Do you think you can hold completely still for several seconds? I used to think so about myself. Then I studied photography and learned otherwise. I sway and move a little bit over time. We all do. However, this is terrible news for long exposure photography. This swaying will introduce motion blur into an otherwise sharp photo. This is why we invented and still use the tripod to this day.
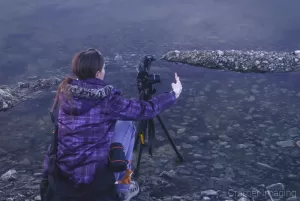
I’ve taken many a long exposure photo as a landscape photographer. It’s how I create silky water photos and night skies with the Milky Way. It’s the only way to see something in a low or no light situation. Check out these examples of long exposure photography.


In fact, I’ve only managed 1 single long exposure photo in my hands. Still, I also used the couch to help brace my camera and keep it still for the duration the shutter was open for. Perhaps you think that’s cheating. It may very well be so. Still I captured this shot only this one time.

I’ve never repeated this incredibly lucky shot in a dim room. I’ve only ever kept my photos like this sharp when on a tripod. You won’t beat the odds here either. Don’t try and hand-hold long exposure shots. You probably won’t like the results.
I remember being a beginner photographer. I had all sorts of ideas about photography which turned out to be wrong. Still, I bet you have a few ideas yourself. You probably think that you can snap off a quick photo or 2 and nail the shot. I know I did. Experience taught me otherwise.
Many’s the time when I thought I had the shot I wanted only to come home and learn otherwise. I was too hasty. Sadly, I didn’t stop and try for different stuff. I simply fired the shutter a few times and called it good. Every time that happened, I could almost guarantee I’d come back with garbage. It’s only after a few hard and disappointing lessons that I started slowing things down.
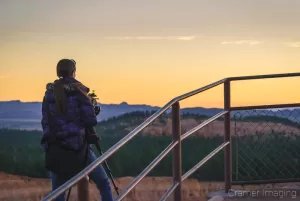
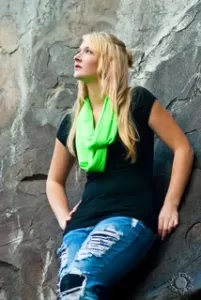
Now, I try for different points of view and spontaneous shots. Most of those spontaneous shots are last-minute as I’m returning to the car. More often than not, those end up being my best photos of the shoot. It happens often enough that I’ve minorly self-styled myself the “Queen of Last Minute Shots.” It’s true. Here’s a couple examples.


I took both of these photos literally as I was leaving the site. I felt I already captured the shot I went there for. These were merely extras for the fun of it. They worked out well. If you want to see more such photos, then check out the article linked above. I display more examples of such photography in my portfolio.
 If you intend to pursue modeling photography, this tip is especially important for you as a beginner photographer. Most models take several dozen shots to warm up and figure out what you’re trying for. You might expect to take a good hundred or so photos simply as a warm-up for both of you.
Professional modeling photographers often take the first 40 or so photos they take and throw them away without looking further at them. Those photographers know it takes a minimum of that many exposures before the model starts to warm up. So, those warm-up photos aren’t worth anything.
If you, as a beginner photographer, want to pursue modeling photography, then you first shots will definitely not be your best. Oftentimes, those photos will be your worst of the shoot. The best stuff will often be towards the end of the shoot.
It’s true that Photoshop (or related photo-processing programs) can be magic. There’s a lot which Photoshop can and cannot do. Let’s discuss a couple options on both sides of the equation.
Need a little color correction? Easy. Want a touch more sharpness? You got it. Photo a bit under-exposed? Quick fix. Want to resize your photo a bit via enlarging, shrinking, or cropping? Can do. Need a quick spot removal? Photoshop is your tool.
Want to lose about 50 Lbs in your photo? Ummm….. That’s actually hard to make look right. Need to graft 2 different pictures together? It might work depending upon what you want done. Want to “zoom and enhance” a tiny pixelated corner of a photo Star Trek style? Not happening.
Do you get the idea?
Photoshop is a powerful photo-processing tool. However, even it has limits. You’re better off getting things right (or as close to right as possible) in the camera itself before you use Photoshop. The idea is that you do your best to get the perfect shot in camera. Then you use Photoshop or other related tools to add that extra bit of sparkle and make the photo absolutely perfect.
Notice how good the original raw photo looked before Photoshop. The software only made something already good into something better. Let’s put things a different way. You can’t take rotting garbage and make a high-end gourmet meal. Also, you can’t take scraps of cloth and make a ballgown. So why do you think you can fix a terrible photo in post-processing? Been there, tried that. It won’t happen.
So, in conclusion, these are a few more pitfalls I hope you’ll avoid in your photography journey. I remember being a beginner photographer myself. I needed all the help I could get. We all can learn from our own mistakes. However, it’s in learning from others’ mistakes where we learn much quicker if we’re willing to do so. I hope you’re willing to learn from some of my mistakes. I’ll keep sharing beginner photographer tips for those who are willing. Links to my other articles included at the top. Stay tuned for the next episode.


Receive monthly updates in your inbox from us.