The day I looked forward to for months finally arrived. It was the day of the annular solar eclipse over Southern Utah. Indeed, I had plans to both see and photograph the eclipse for myself. I’d been working and planning that shoot for a while. It finally arrived and I was ready. Here’s what I captured of that ring of fire as it passed over me.
My last attempt at photographing a solar eclipse was in 2017. Sadly, that didn’t go as hoped. Still, I learned a lot from that shoot. I took my experience and researched out more of what I needed to do to make it work this time. My efforts paid off.
The Equipment
Some of the first things I needed I already possessed. My camera and lenses were adequate enough for the task. I still have my solar filters from 2017. Also, my 2017 eclipse guide book had a few clues which I brushed up on. In fact, I didn’t really require much in the way of equipment additions or upgrades.
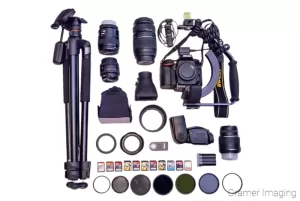
I did, however, purchase a “lens bucket” for my harness system so that I could quickly stash extra gear as necessary. It came in handy too. I also purchased some magnetic filter holders. One of my big problems with the last eclipse was that I couldn’t remove my solar filters fast enough during totality. The screw-on nature of those filters is usually a bonus. Not so in that situation. It was a handicap and hindrance. It cost me the shot. I went into this eclipse better prepared for this challenge. That was all the equipment I bought to use with the eclipse. Ok, I also bought some eclipse glasses for my eyes, but those don’t count for my camera.
The Site
The next challenge was to decide where to stand. This eclipse would take place earlier in the day than the last eclipse. I had the opportunity to choose a foreground in addition to a spot to view the sky. So, I studied the available maps showing eclipse visibility in order to choose just the right place. There were several very good options within reasonable driving distance. In fact, I didn’t even need to leave town to see it. However, I wanted a better foreground than that.
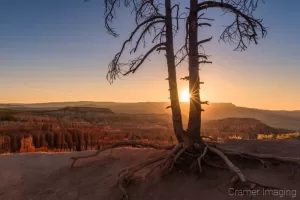
I carefully considered the value of locations like Kodachrome State Park, Piute State Park, Otter Creek State Park, Goblin Valley State Park, Capitol Reef National Park, Red Canyon, and more. Several more locations I thought of were outside the band where the ring of fire was visible. I automatically discounted those. Other locations had physical barriers which would block some or even all of the show in the sky. That was unacceptable too. In the end, I decided that Bryce Canyon offered the best balance of good foreground and reasonable driving distance. So, I elected to choose Bryce to see the ring of fire.
Surveying Bryce for the Foreground
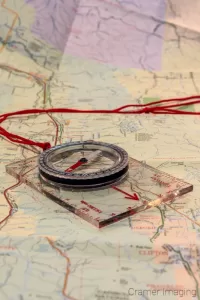 After finally decided to go to Bryce Canyon National park for the eclipse, I needed to further decide my foreground. If you’ve been there before, you know there’s a lot to choose from. You are spoiled for choice. However, I needed a view which would line up with where the path of the sun took the eclipse. That need is more specific. It required research and surveying. I located the azimuth and altitude for that purpose. Armed with this information, I set about choosing my foreground.
Since this year is also Bryce Canyon’s centennial anniversary, I considered using one of the more prominently known (or even famous) landmarks as a foreground. It seemed fitting. Thor’s Hammer leaped to mind almost immediately. However, it wasn’t a suitable foreground because the surrounding formations would hide the hammer when facing the direction of the eclipse. I took those coordinates and a compass onto the trail to confirm. So, I needed some place else.
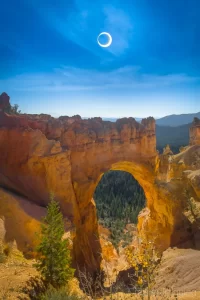
I had three options to explore and planned on using 1 or more as backup options. With those same coordinates, I learned that 2 locations would work well. The third was unsuitable as the sun and moon would be too high in the sky to utilize the interesting foreground at that viewpoint. So, I discarded that idea. While exploring my options, I decided to stop at one of the quick views along the road deep in the park. It was on a whim and I expected it was unsuitable too because of its restricted view. Can you imagine my shock and surprise when I tested things out and realized that I could have perfect unobscured view of the eclipse and ring of fire there? Since that spot was the semi-iconic Natural Bridge, I immediately added it to the top of my foreground list. It ended up winning out too.
The Preparation
The night before the eclipse, I planned out exactly what I thought I would need onsite. After all, I planned on arriving extra early and leaving after the eclipse completed. That would be about 3 hours. I just might need a few things besides me and my camera.
So, I packed up all the gear I planned on taking. This included my cameras, camera bag, harness system, tripods, water, snacks, chairs, and eclipse glasses. Because it was an early October morning high in the mountains, I also prepared with cold weather gear and clothing layers. I didn’t want to risk anything at this shoot. It won’t happen again and there’s no pause button on an eclipse.
Once compiled, I then hauled everything out to the car. I wanted to reduce the morning friction of getting out of bed and into the car. It did indeed help matters. Also, it made sure that my lenses were at the ambient temperature of the outside so they didn’t fog up at a critical moment.
The Day of the Ring of Fire Eclipse
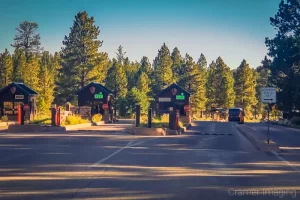
Having experience with busy Bryce Canyon entrance days, I knew that we needed to arrive extra early. There was a good chance the rangers would close the park entrance to private vehicles. They seem to do so every Saturday of Memorial weekend. I didn’t want to run that risk. When we arrived, a couple parking lots were already full. There were signs out and rangers directing traffic. Thankfully, I chose a much less popular and more recessed portion of the park to shoot my photos. That parking lot didn’t fill up at all.
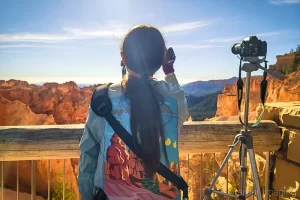
Once we arrived at Natural Bridge, I started setting things up. Out came the chairs and other creature comforts. I also set up 2 tripods with 2 different camera bodies so I could capture the ring of fire eclipse up close in addition to the foreground which I so carefully selected. Then we waited for the main event. It was indeed a cold morning. I was glad for the layers.
Shooting the Ring of Fire
The build-up and cool-down of an eclipse feel interminably long. People mill about and talk. They pull out their eclipse glasses occasionally check on the progress. As the big moment approaches, the anticipation and excitement builds. If you don’t know exactly when the eclipse is supposed to start, it’s difficult to tell with an annular eclipse. Not so much with a total solar eclipse.

Once the eclipse reached annularity, I started shooting. Several other photographers right next to me began doing the exact same thing. We almost forgot about each other as we were so focused on the sky. An annular eclipse gives you about 4 minutes to shoot photos of the ring of fire. A total eclipse gives you about 2 minutes. This meant that this eclipse was a lot more relaxed than the last one was for me. Still, I didn’t want to waste a single minute.

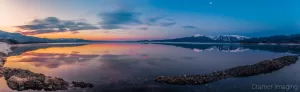
I took several photos of the eclipse in telephoto and also took the time to shoot a panorama of the foreground with the ring of fire visible. I knew I would process up and composite things later, but I still wanted the foreground during the eclipse. However, I did notice that the light quality didn’t change that much with the annular eclipse as compared to the total eclipse. There’s a dramatic change in the light quality and brightness during a total eclipse.

I took several different exposures of the eclipse at various stages of completion. From experience on site, if I relied upon the first shot, I would have walked away with poor quality images which were blown out. It was only once I took the first shot that the camera sensor calmed down enough to properly expose the sun (even with the deep neutral density filters on). This meant I would properly capture the eclipse without the worst of the lens flare ghosting images which show up. These multiple takes came in handy during processing.
I wanted to bookend this eclipse. This meant that I shot photos from start to finish. I didn’t just shoot the peak. I shot the sun and moon at 10 minute intervals to capture everything. This extended shooting session was a two-fold benefit for me. Not only did it give me many more options for eclipse photos than I would have had otherwise, but also it kept me from leaving during the mass exodus. After all, Bryce Canyon only has 1 road and 1 gate. I missed out on the long line leaving after the eclipse finished.
Post-Processing the Ring of Fire
With the eclipse photo session in the history books, the time came for post-processing. I knew that I wanted to try out several different composite images which I’d seen before. A timelapse of the eclipse was definitely 1 I wanted. That’s why I started so early, stayed so late, and took so many shots. With my foreground of Natural Bridge, I managed to do just that. I created a perfect single shot in addition to the timelapse I wanted.
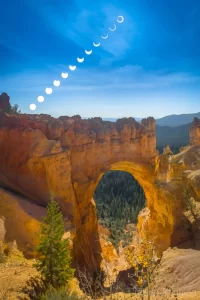
Then I started playing around with the timelapse images. I knew I could do more than a simple streak across the sky. So, I saw what all I could do. Here’s what I came up with. Perhaps I’ll play more, but the efforts of aligning each individual layer (each stage of the eclipse is its own layer) is tedious and precise. So, maybe not. We’ll see.


Conclusion
So, why did I tell you ALL of this when I could have just shown you the pictures and called it good? It’s not to brag. Ok, maybe just a tiny bit of brag. But the bragging is more to show what I learned and how I adapted to make things work. My first eclipse photo shoot was a failure. This one was a success. But mostly I tell you all of this to show you just how intense of an experience photographing a solar eclipse is. It’s a brief 2-4 minute window (depending on your eclipse type) so you had BETTER be prepared.
Now that this long and detailed story is out of the way, what do you think of my eclipse photos? How do you think they turned out? Do you like them? Do you hate them? Due to the nature of how shooting photos of the sun works, there’s no way I could take eclipse photos showing both the sun eclipsing and the foreground properly exposed. They were bound to be composites. So, don’t rag on me for that. But other than that, what do you think? Please leave your thoughts in the comments section below.

Best Sellers
Cramer Imaging Newsletter
Receive monthly updates in your inbox from us.